ShotSumo
Features
Everything ShotSumo does today, stated in full — not the highlights, the complete list. Every feature below says what it does, how you invoke it, what it does by default, and shows a worked example. Every fact is true of the version on the Mac App Store right now; nothing here is a plan.
What it is
ShotSumo is a native macOS app, written in Swift 6 with SwiftUI and AppKit, requiring macOS 26 or later. Capture and markup are free, permanently — no account and no time limit. ShotSumo Pro, one optional subscription at $9.99 a year after a two-week free trial, adds four editor tools: Pixelate, Spotlight, numbered Step badges, and export to AVIF or HEIC. There is no watermark. Anyone who installed ShotSumo before version 2.0 keeps those four tools unlocked, for good.
It lives in the menu bar and has no Dock icon while nothing is open. A Dock icon appears while an editor or the Preferences window is open, and goes away again the moment the last one closes — the accepted cost of having a real menu bar with its own Screenshot menu, which has to live somewhere.
Defaults at a glance
The one thing every other page skips: what each behaviour does out of the box, and exactly where in Preferences to change it if you want something else.
| Behaviour | Default | Where to change it |
|---|---|---|
| Capture region hotkey | ⌘⇧9 | Preferences → Capture Hotkeys → Capture region |
| Capture window hotkey | Unbound | Preferences → Capture Hotkeys → Capture window |
| Capture full screen hotkey | Unbound | Preferences → Capture Hotkeys → Capture full screen |
| Capture Same Region Again hotkey | Unbound | Preferences → Capture Hotkeys → Capture same region again |
| Selection size badge units | Device pixels; ⌥ during the drag also shows points | Not user-configurable |
| Aspect-ratio lock | Free; a set ratio lasts one capture unless remembered, and never survives a quit | The padlock in the size badge |
| Remember aspect ratio | Off — a lock resets to Free on the next capture | Preferences → Editor Behavior → Remember aspect ratio |
| Save format (⌘S) | PNG (AVIF and HEIC need ShotSumo Pro) | Preferences → Save Location → Format |
| Auto-save folder | None chosen — the first ⌘S asks | Preferences → Save Location → Folder |
| Reveal in Finder after save | On | Preferences → Save Location → Reveal in Finder after save |
| Close editor after copy | On | Preferences → Editor Behavior → Close editor after copy |
| Close editor after save | On | Preferences → Editor Behavior → Close editor after save |
| Close idle editor windows | On, after 15 minutes; a warning appears a minute before | Preferences → Editor Behavior → Close idle editor windows |
| Remember last tool and colour | On | Preferences → Editor Behavior → Remember last tool and colour |
| First tool/colour/stroke, before anything is remembered | Rectangle, red, medium | Fixed — not a preference |
| Copy (⌘C) format | Always flattened PNG, regardless of the Format setting | Not user-configurable |
| Spotlight dim strength | Fixed 55% black wash outside the drawn region | Not user-configurable |
| Step badge numbering | Starts at 1, +1 per badge; undo takes the number back with it | Not user-configurable |
| Step badge size | Remembered independently of the shape tools' stroke width | The editor toolbar's size control, while the step tool is selected |
Preferences can also export every preference and hotkey to a file, and import them back — handy when moving to a new Mac or after a reinstall (Preferences → Backup → Export Settings… / Import Settings…). The save folder isn't included, since macOS ties its permission to the Mac it was chosen on — pick it again after importing.
Capture
Region capture (freeze-frame)
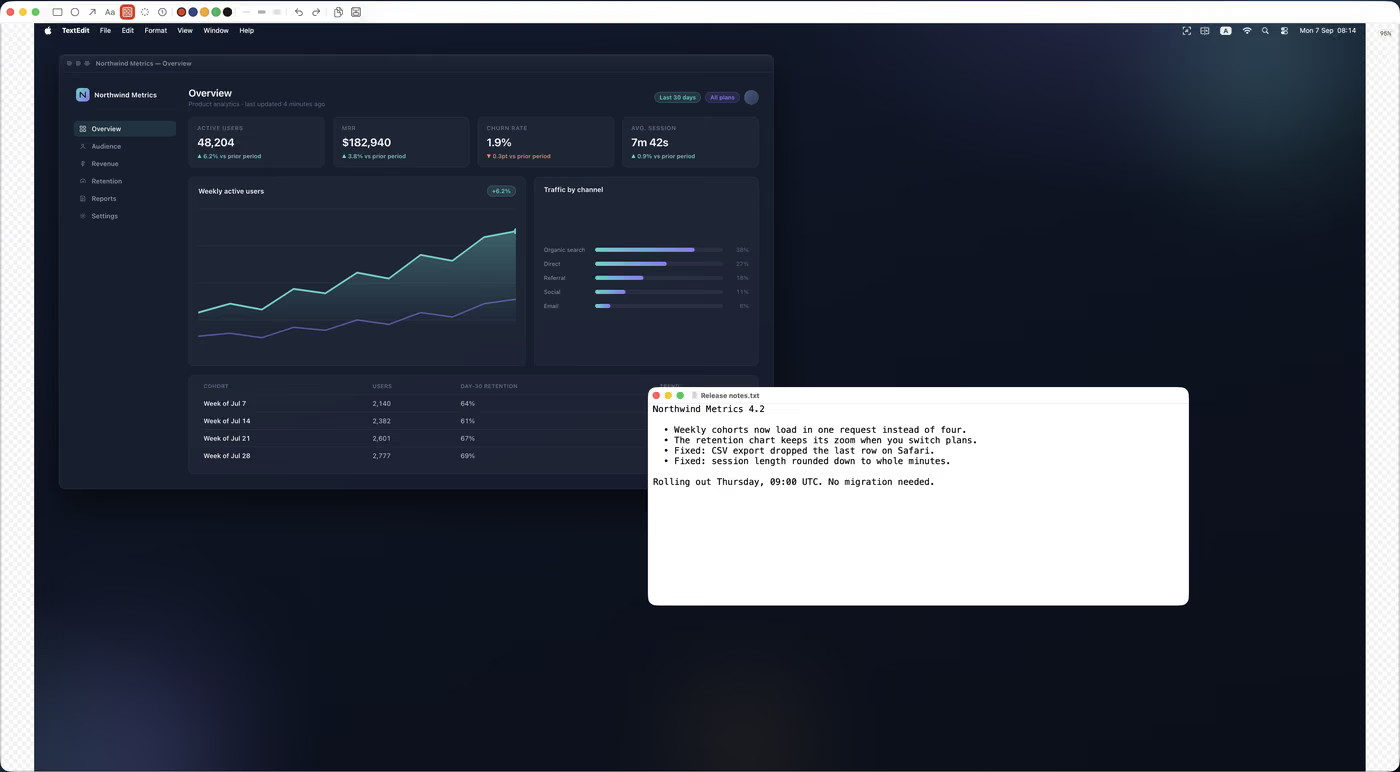
Bound to ⌘⇧9 by default. The screen is captured first, so menus, hover states and animations stay exactly as they were at the moment you pressed the key — only then do you drag a marquee on the frozen picture. Releasing the mouse doesn't take the shot: the rectangle stays on screen with eight grips, one at each corner and one at each edge midpoint. Drag a grip to resize the rectangle, drag from inside it to move it, or drag from outside it to start a fresh marquee, discarding the one you had.
A caption under the rectangle names the keys — ⏎ capture · ⌘C copy · ⌘S save · ⎋ cancel
— and Return, the numeric keypad's Enter, or a double-click inside
the rectangle commits it to the editor. Esc backs out of the whole capture in
one press, from the marquee or from the pending rectangle alike — there's no separate
"back to the marquee" step. The border and its grips switch colour to stay visible on
whatever's underneath — white over dark content, blue over light — so a rectangle drawn
over a dark window doesn't wash out against it. A selection still can't span two
displays.
⌘C and ⌘S also work straight from the pending rectangle, with no need to open the editor at all: ⌘C copies it to the clipboard and ⌘S saves it to your configured folder, and whatever app was in front before the capture started stays in front — a brief confirmation appears near the bottom of the screen either way. ⌘C always copies PNG regardless of the Format preference, the same rule the editor's own Copy command follows; ⌘S uses whichever format is configured (PNG by default), asks for a folder the first time if none is chosen yet, and honours "Reveal in Finder after save" the same way an ordinary editor save does. Neither shortcut does anything before the first drag — with the overlay up and nothing pending yet, ⌘C and ⌘S are inert.
Selection size badge
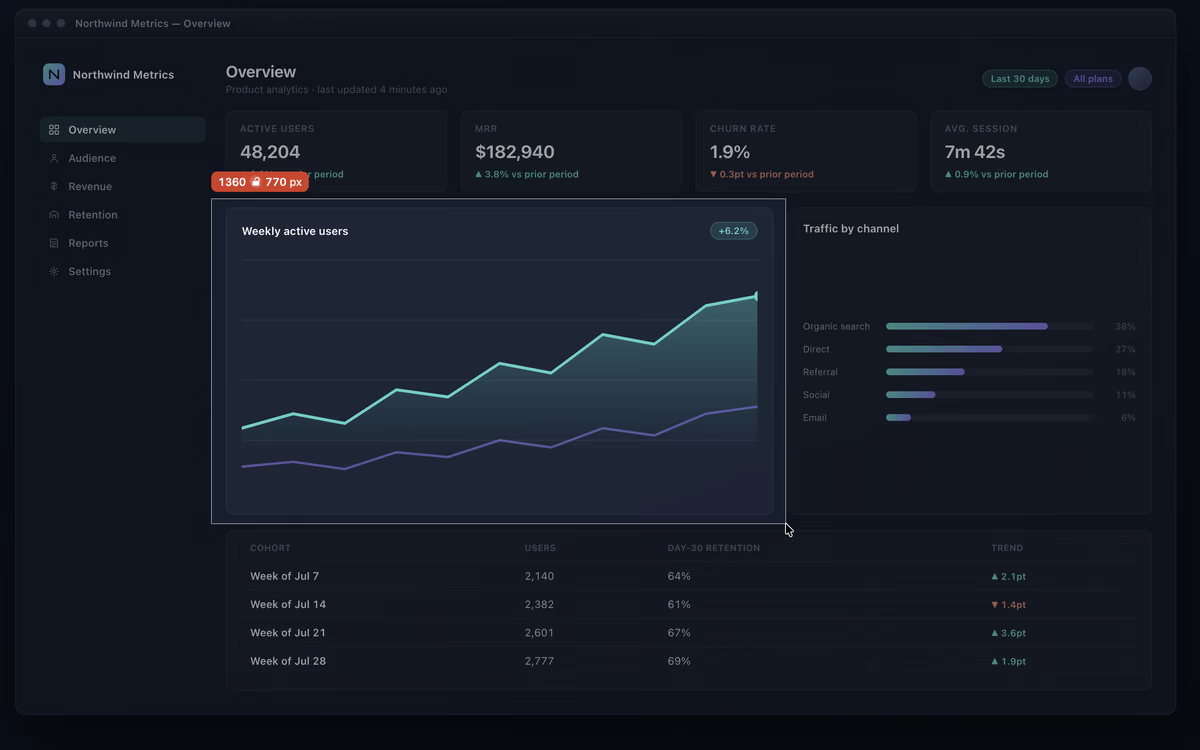
While you drag out a region, an accent-coloured pill sits above the selection's
top-left corner and reads 1360 × 770 px in monospaced digits — the exact
dimensions of the image file you'll end up with, in device pixels, not points. Drag the
selection right up to the top of the display and the badge tucks inside the edge instead
of getting pushed off screen. There's no badge before you've dragged anything — with
nothing selected yet, the overlay is a plain scrim.
The badge doesn't go away when you let go of the mouse. Releasing leaves the rectangle pending (see Region capture, above), and the badge stays parked above its top-left corner for as long as it's pending — that persistence is what makes the padlock inside it clickable at all: it's a control inside the badge, so the badge has to still be on screen for there to be anything to click.
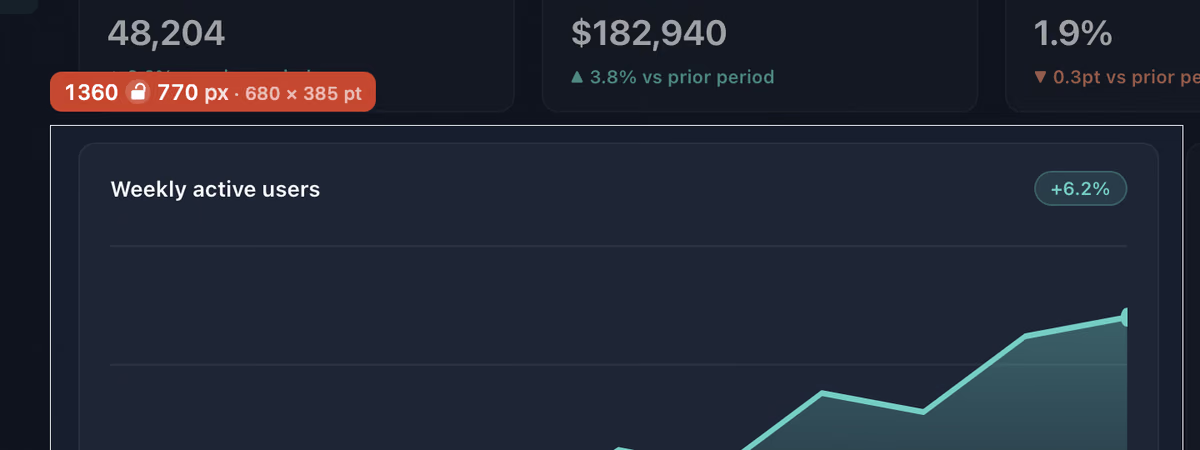
Hold ⌥ while you drag and the badge appends the point size on the same line,
smaller and dimmer: 1360 × 770 px · 680 × 385 pt. Let go of ⌥ and it drops
back to pixels alone. On a display that isn't Retina, holding ⌥ changes nothing — the two
numbers would be identical. There's no Preferences toggle for this, no menu item, and no
on-screen hint: this page is the only place to find out it exists.
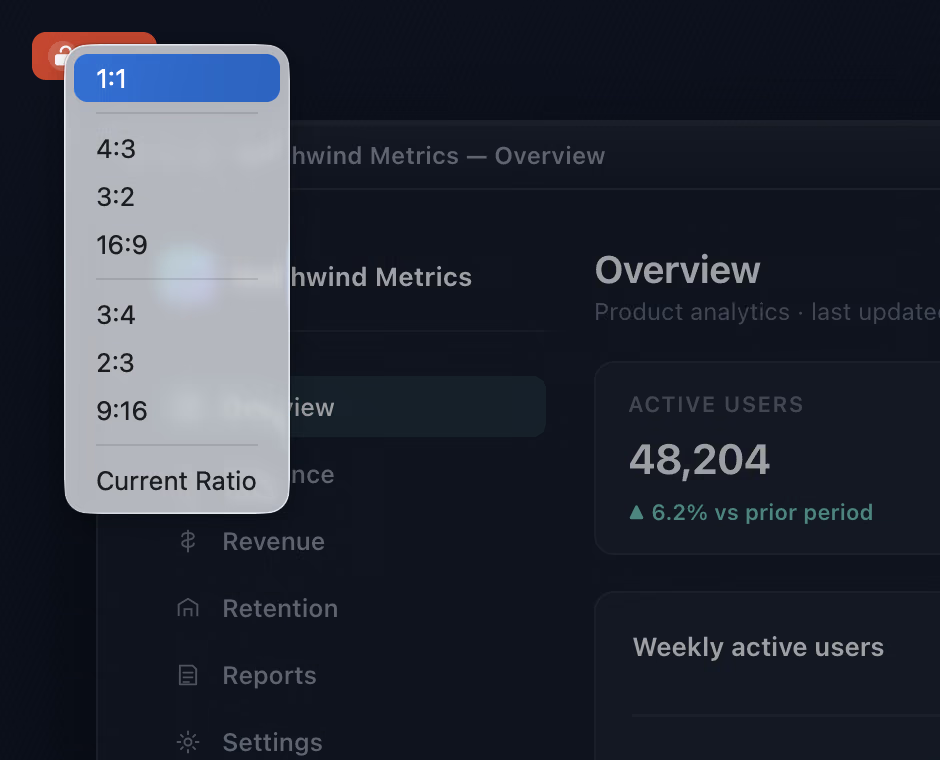
A small padlock sits inside the badge, in the separator slot between the two numbers —
an open shackle for a free selection, closed once a ratio is locked, and the same
width either way, so locking never changes the badge's width. Click it for a menu:
Free first, then
1:1, then landscape 4:3, 3:2,
16:9, then portrait 3:4, 2:3,
9:16, then Current Ratio, which names the number it
would freeze — Current Ratio (1.60:1), say — reading whichever rectangle is
currently pending, or the last region you captured if nothing is pending yet; it's
greyed out only when there's nothing to freeze. Pick a ratio while a rectangle is
pending and it reshapes immediately, anchored on the rectangle's top-left corner — the
top and left edges hold still, and it grows right and down to the new shape. Once a
ratio is set, it constrains every resize and every new drag that follows, and the badge
appends it after the pixel size instead of replacing the numbers:
1550 × 872 px · 16:9.
By default a lock lasts for one capture only — start a fresh region capture and it's back to Free, with nothing to clear by hand. Preferences → Editor Behavior → Remember aspect ratio keeps it set across captures instead, until you change it again. Either way it never survives quitting ShotSumo — a ratio set on Monday silently shaping an unrelated drag on Friday is exactly what that resets.
Window capture and full-screen capture
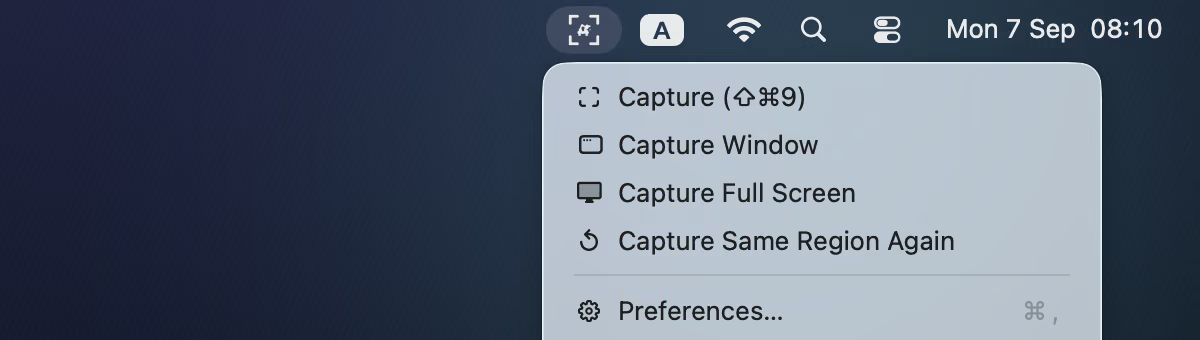
Window capture grabs one whole window under the cursor. Full-screen capture grabs an entire display — one menu item per connected display once more than one is attached. Both ship unbound on purpose, so a fresh install can't collide with a shortcut you already rely on; bind either one in Preferences and it becomes active immediately.
Capture Same Region Again
Repeats your last region capture straight into the editor — no dragging, no dimming. It's remembered only for as long as ShotSumo keeps running; quit and reopen and there's nothing to repeat until you make a fresh region capture. The menu item greys out while the display that region was taken on is disconnected, rather than capturing the wrong screen.
The editor
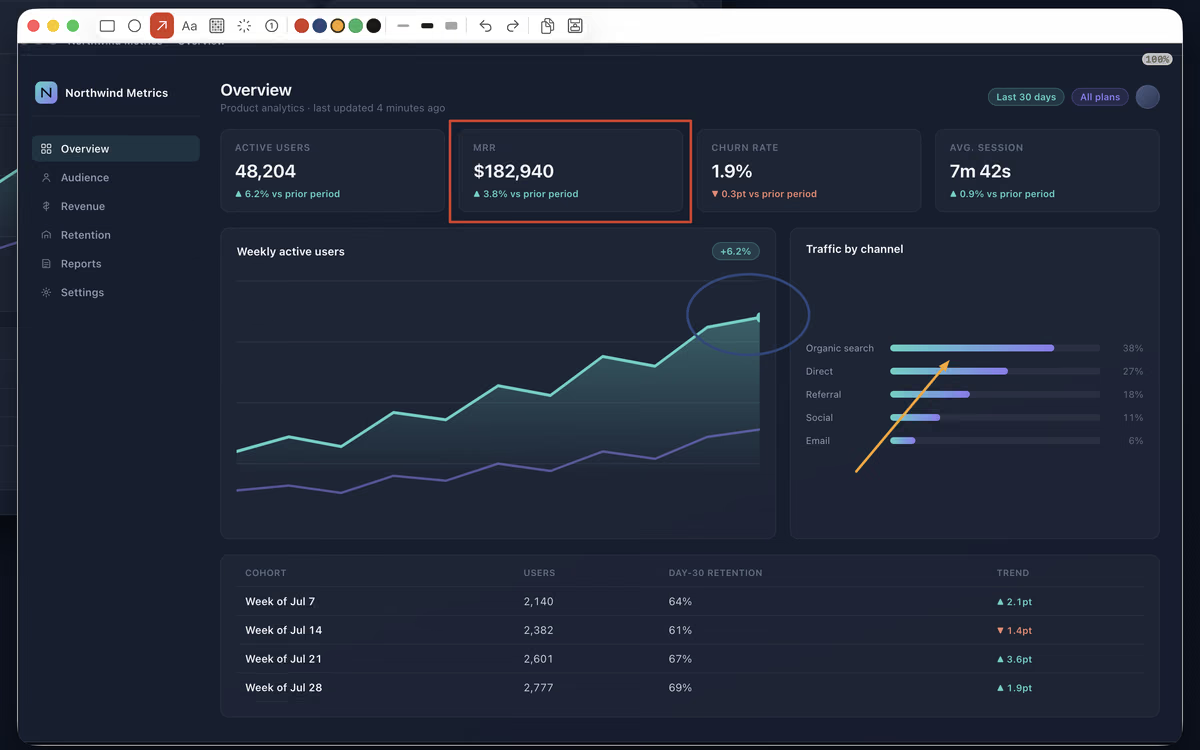
Every capture opens straight into the annotation editor. Each tool has its own colour and stroke width, and every stroke is undoable and redone the same way. A Preferences toggle, Remember last tool and colour (on by default), opens each new capture on the tool, colour and stroke width you used last, instead of resetting to rectangle, red, medium every time — turn it off in Preferences → Editor Behavior to always start from those fixed defaults.
An editor window left untouched closes itself after 15 minutes, with a warning appearing a minute before it happens — touching the window in any way, even just bringing it to the front, cancels the countdown. Adjust the delay, or turn the whole thing off, in Preferences → Editor Behavior → Close idle editor windows.
Rectangle, ellipse, arrow
Three vector shapes, drawn by dragging on the canvas, each in the toolbar's current colour and stroke width.
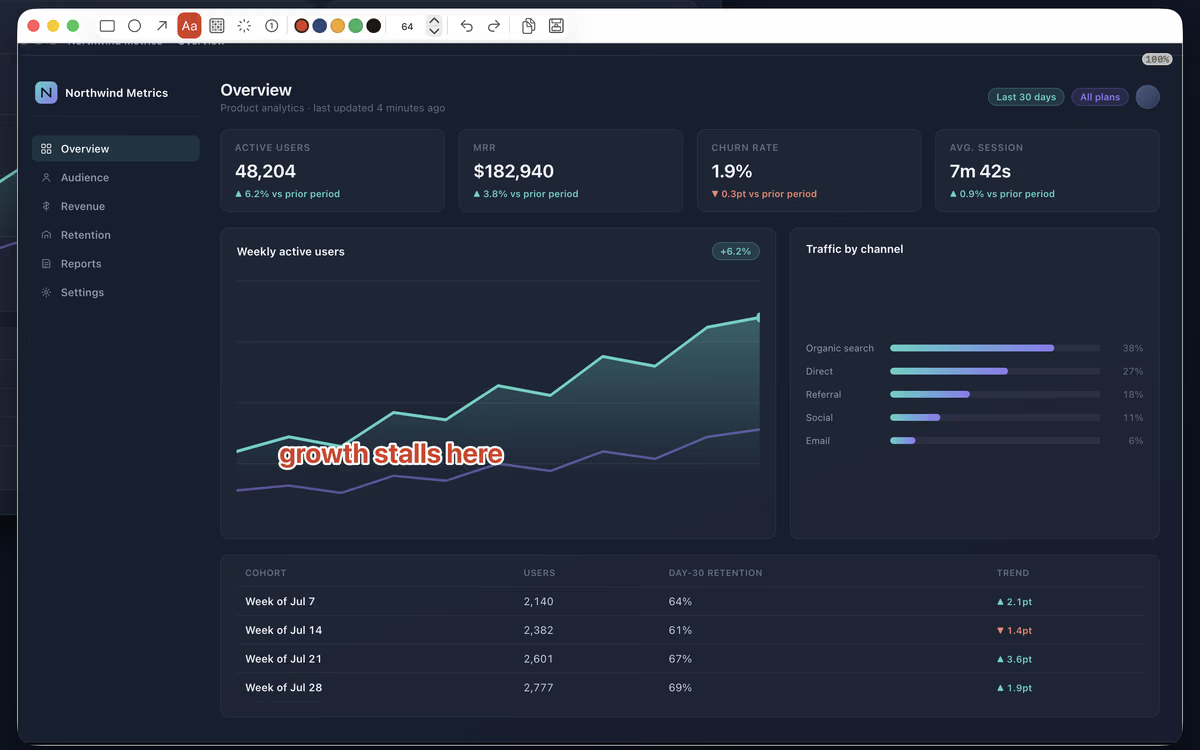
Text captions
Click on the capture and type — the words land straight on the picture with a contrasting outline so they read over any background, light or dark. A placed caption stays editable: click it again to keep typing, or drag it to a new spot. Colour comes from the same swatches the shapes use.
Pixelate — requires ShotSumo Pro
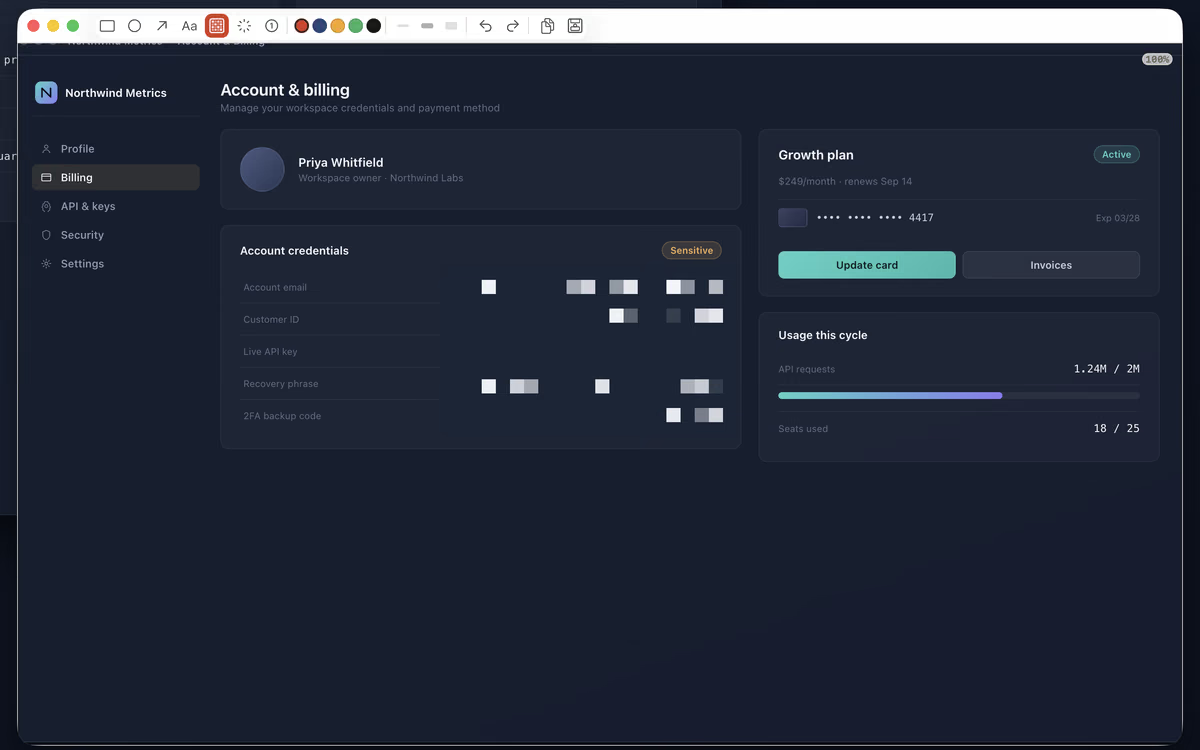
Drag a region to mosaic it — redact a name, a face, or a stray password field before sharing. It has no colour control, and the toolbar's stroke-width control is visibly disabled while Pixelate is selected — faded out, not merely inert — with a tooltip reading "Stroke width does not apply to Pixelate." Only the drag itself sets the size of the mosaic block.
Spotlight — requires ShotSumo Pro
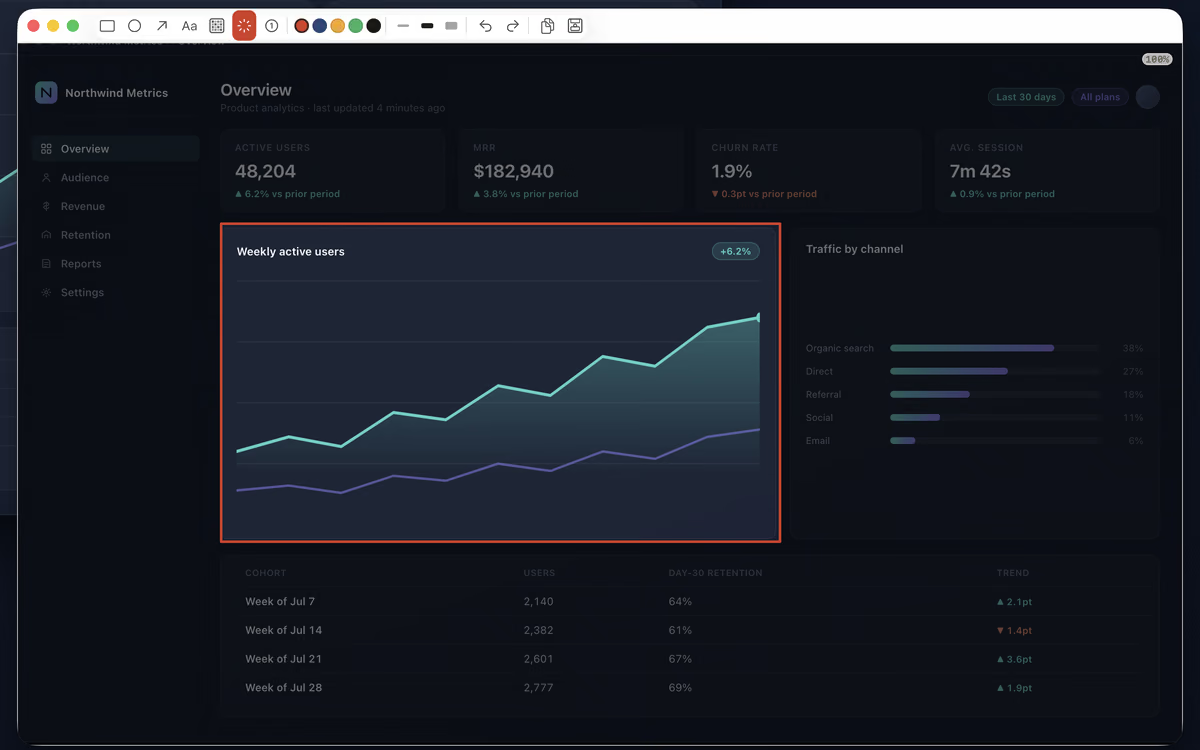
Draw a box and a 55% black wash covers everywhere outside it — fixed, not a preference — while the drawn region itself keeps the picture's original brightness. Draw more than one: the wash never stacks where regions overlap, and any shapes or captions added on top stay at full strength over it.
Numbered step badges — requires ShotSumo Pro
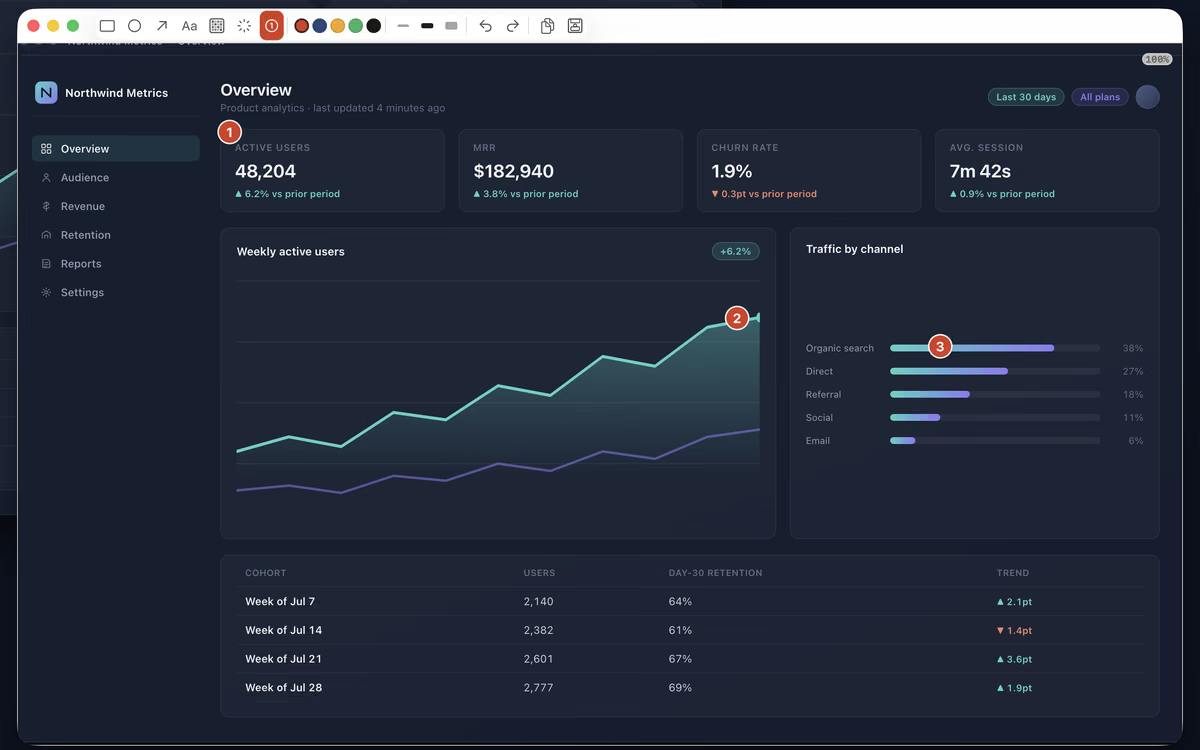
Click to drop a filled, numbered circular badge — the next click is the next number, starting at 1. The badge picks up the toolbar's current colour, but its size is remembered separately from the shape tools' stroke width — changing one no longer changes the other, the same way the text tool's caption size already works on its own. Its numeral is drawn with a thin contrast rim so it stays legible whichever colour that is. Undo removes the last badge placed and the count goes back with it — there is no separate counter to reset. With the step tool selected, ⌥-click any existing badge to remove it — every badge after it renumbers down by one — and a single undo restores both the removed badge and the numbers it displaced.
Screenshot menu — Save, Copy, Undo, Redo, Close
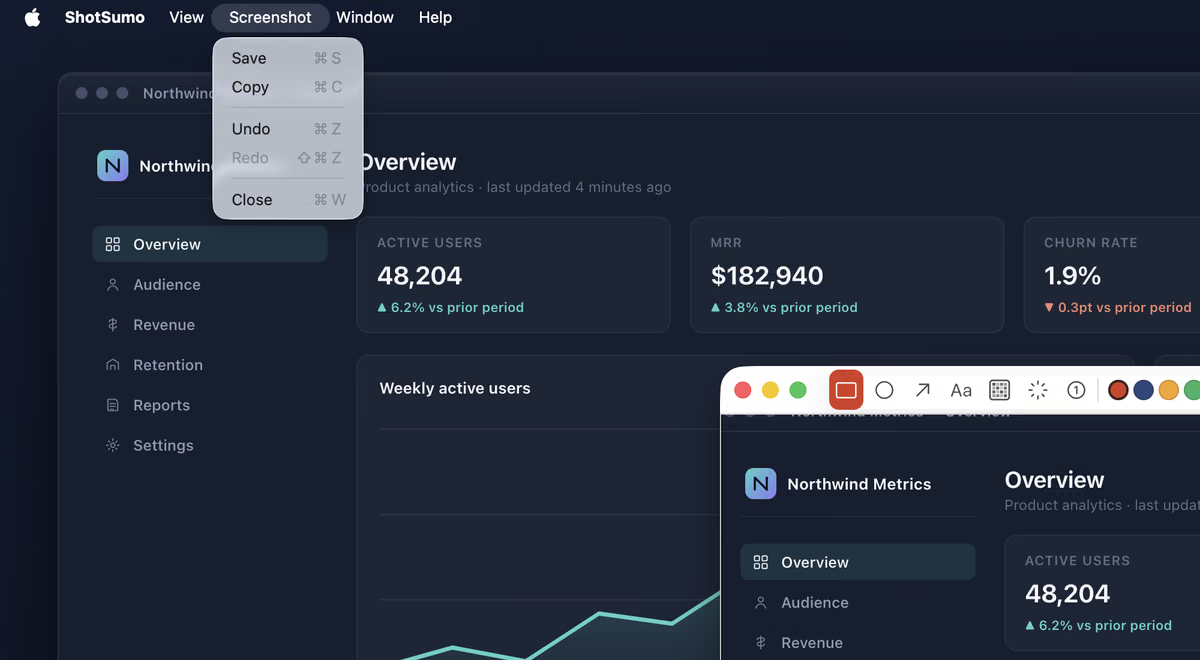
All five live in one Screenshot menu in the menu bar, rather than split across File and Edit — there is no document to open and nothing to paste into. ⌘S saves, ⌘C copies a flattened, full-resolution PNG to the clipboard regardless of the Format preference, ⌘Z / ⇧⌘Z undo and redo, and ⌘W closes the window.
The menu bar and its status item
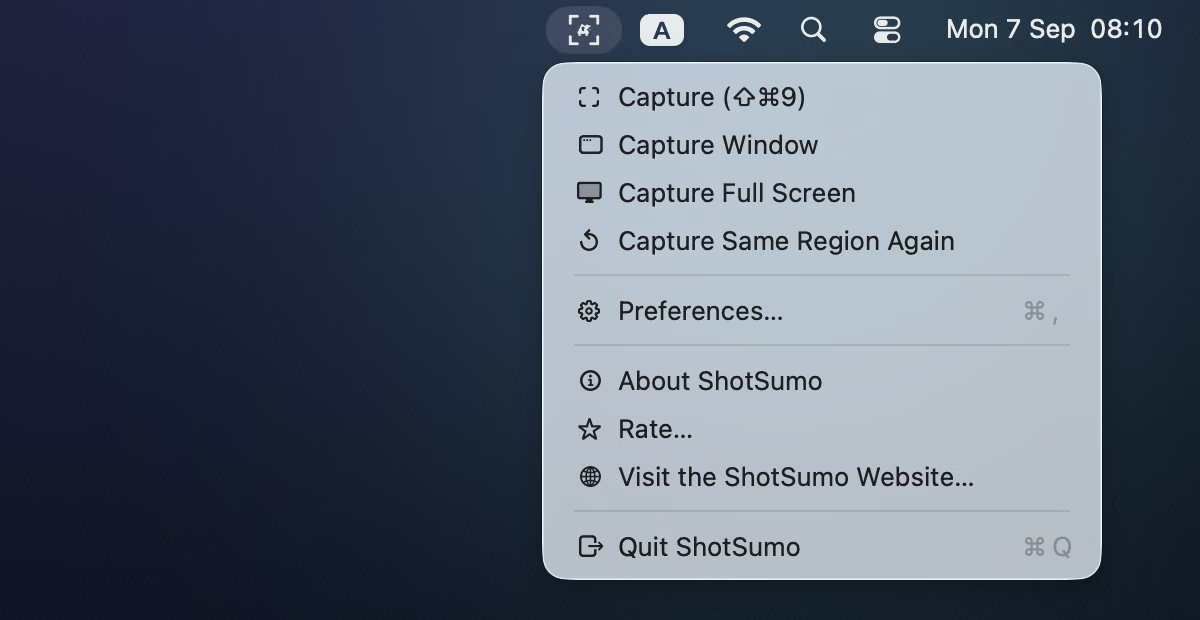
ShotSumo lives in the menu bar with no Dock icon while nothing is open — a Dock icon appears only while an editor or the Preferences window is open. Its status-item menu holds every capture verb (each showing its currently bound hotkey, or nothing if unbound), Preferences…, then a fixed closing block — About ShotSumo, Rate… and Visit the ShotSumo Website… — and finally Quit ShotSumo.
Copy and save
⌘C puts a flattened, full-resolution PNG on the clipboard, whichever format
you've picked for saving — that's what other apps actually accept from a paste.
⌘S saves — the first time, ShotSumo asks where in the standard macOS dialog,
and every save after that lands silently in that folder, named to match:
ShotSumo_yyyy-MM-dd_HH-mm-ss.png, .avif, or .heic.
There is no built-in default folder; the app never guesses on your behalf. The same two
shortcuts also work straight from a pending region selection, before the editor ever
opens — see Capture, above.
Preferences offers a choice of three save formats, picked once and used for every save after that — no dialog, no per-save decision. PNG is the default: it is lossless, and the largest of the three. AVIF and HEIC — require ShotSumo Pro are lossy where PNG is not, and far smaller for it. AVIF opens in any modern browser; HEIC is native to Apple's own apps — Preview, Photos, Mail. On a screenshot the loss doesn't show: flat colour and sharp text edges, not photographic noise.
Measured on five real 2880×1800 screenshots, encoded by ShotSumo's own pipeline at quality 0.95 — the PNG column is the same encoder, not a system screenshot, so the comparison is like for like. An AVIF file lands around a twelfth the size of the same picture as a PNG; HEIC around a quarter.
| Screenshot | PNG | AVIF | HEIC |
|---|---|---|---|
| Selection overlay | 3769 KB | 164 KB (4%) | 803 KB (21%) |
| Editor markup | 2077 KB | 204 KB (10%) | 494 KB (24%) |
| Pixelate | 1745 KB | 179 KB (10%) | 407 KB (23%) |
| Menu bar | 3512 KB | 255 KB (7%) | 832 KB (24%) |
| Preferences | 2825 KB | 232 KB (8%) | 614 KB (22%) |
Sandboxed, and asking for only what it needs
ShotSumo runs inside Apple's App Sandbox. The shipping build carries the network entitlement for exactly one purpose — Apple's own purchase system (StoreKit) checking your ShotSumo Pro subscription. There's no account, no telemetry, no analytics, no ads, and no third-party SDKs of any kind.
Screen Recording permission is required — macOS demands it of anything that can read the screen, not a choice ShotSumo makes — and it takes effect only after the app is relaunched once granted.
About the network, so it doesn't need to be taken on faith. ShotSumo has no networking code of its own. The only traffic the app is responsible for is StoreKit's own exchange with Apple to start a trial, buy, restore or renew — it runs entirely inside Apple's framework, never touches your screenshots, and never carries payment details ShotSumo could see. Full detail is in the privacy policy.
What ShotSumo will never do
Not missing features waiting for time — decisions, stated once so they don't need repeating on every page.
- NOCloud storage or a share-link service. No uploading a screenshot to get a link — the feature most other screenshot tools are built around, and the exact thing this one exists to avoid.
- NOAn account. No sign-up, no email, no licence key to type in. An App Store purchase is the entire identity system.
- NOTelemetry, ads, or third-party SDKs. Not anonymised, not aggregated, not "to improve the product," not opt-out. None.
- NOA cross-platform rewrite. ShotSumo is native Swift, and being native is most of what makes it fast. A shared runtime that also runs on Windows would cost exactly what people install it for.
Price
Capture and markup are free, permanently: region, window and full-screen capture, the rectangle, ellipse, arrow and text tools, undo, and copying or saving as PNG — no account, no time limit. ShotSumo Pro is a single, auto-renewing yearly subscription: a two-week free trial, then $9.99 a year, charged to your Apple ID at confirmation. It adds four editor tools — Pixelate, Spotlight, numbered Step badges, and export to AVIF or HEIC — and there is no watermark. Anyone who already had ShotSumo installed before version 2.0 keeps those four Pro tools unlocked, for good.
The subscription renews automatically unless auto-renew is turned off at least 24 hours before the end of the current period. Manage or cancel any time in your Apple ID subscription settings — the app's own "Manage Subscription" button opens that page directly — and use Restore Purchases in the app if it ever needs to re-check your access. Refunds are handled by Apple, not the developer.
Distribution
ShotSumo is distributed through the Mac App Store only. There is no
direct download, no .dmg, and no third-party mirror. Anything you find
elsewhere claiming to be ShotSumo is not ours.
That's not an oversight — it's the point. Every update reaches you the moment Apple approves it, the binary is signed, sandboxed and reviewed before it ever reaches your Mac, and you never have to be the one judging whether a download you found somewhere is the real thing.